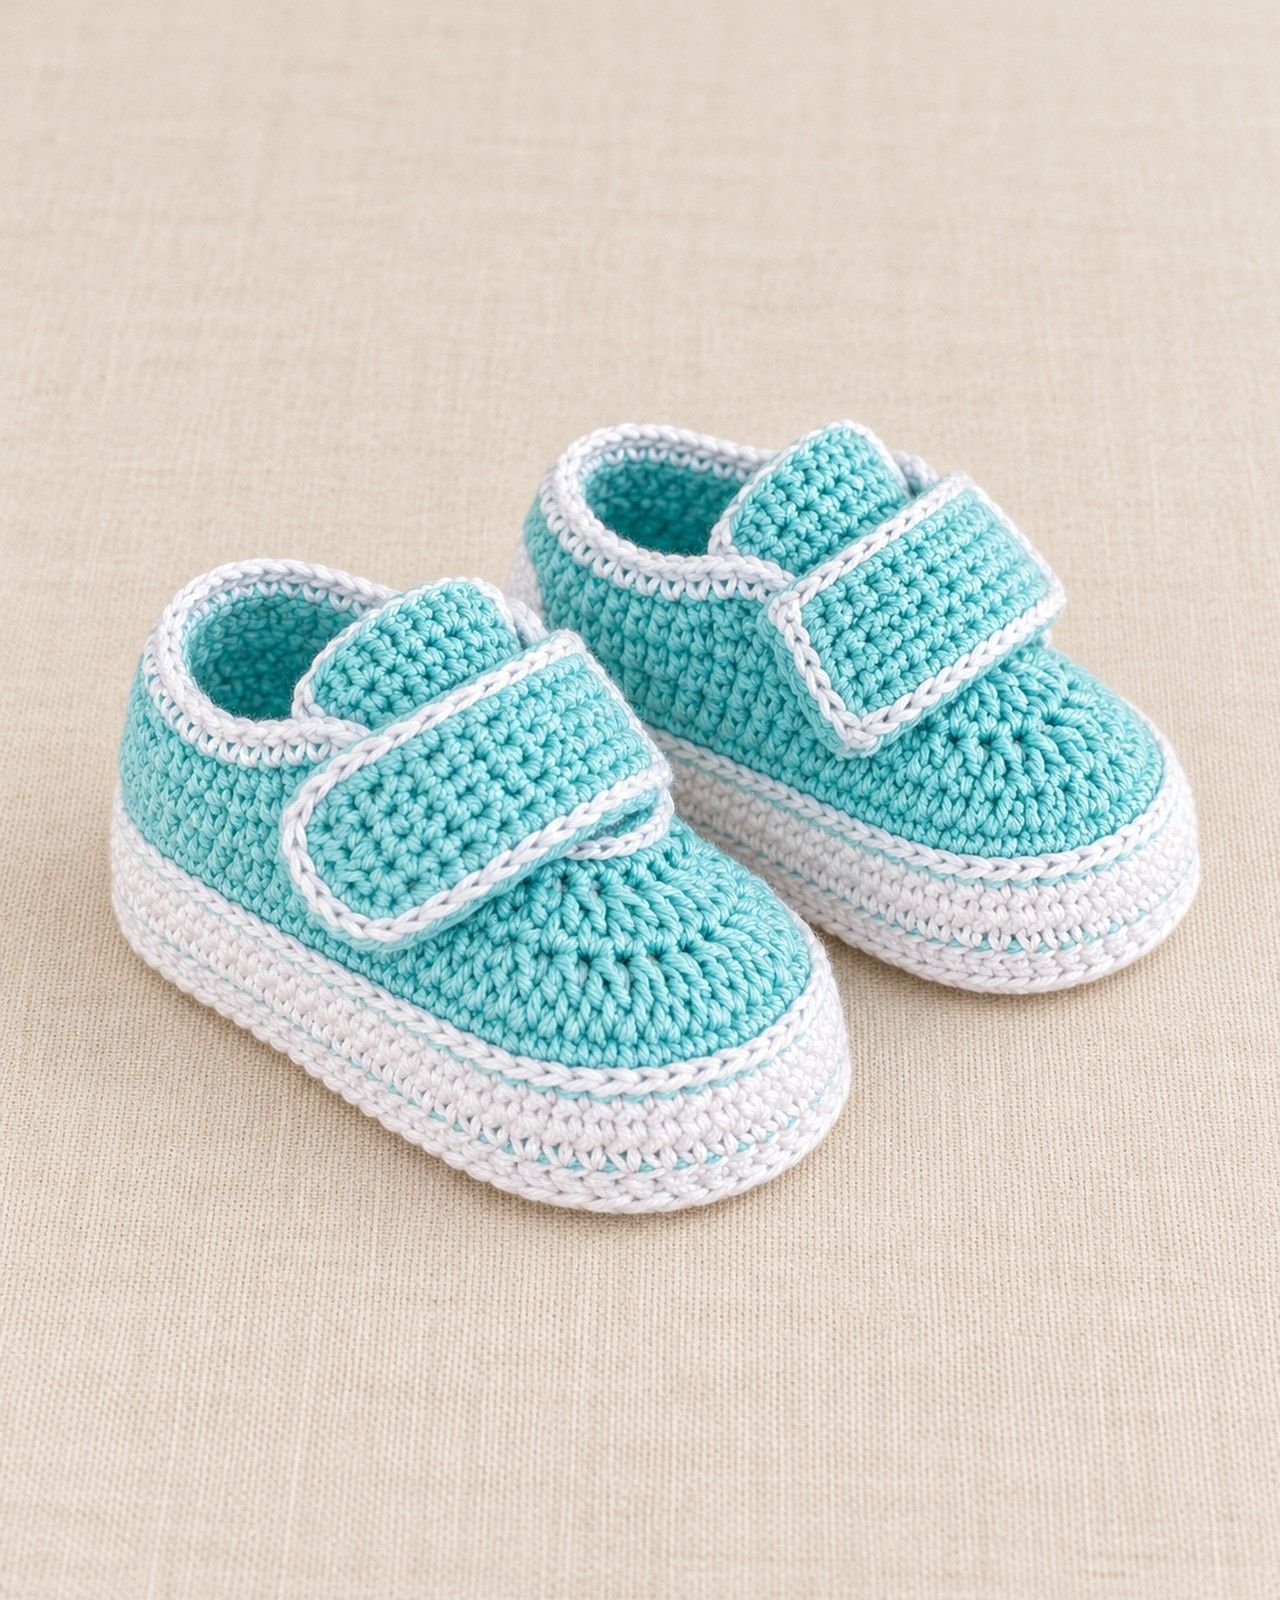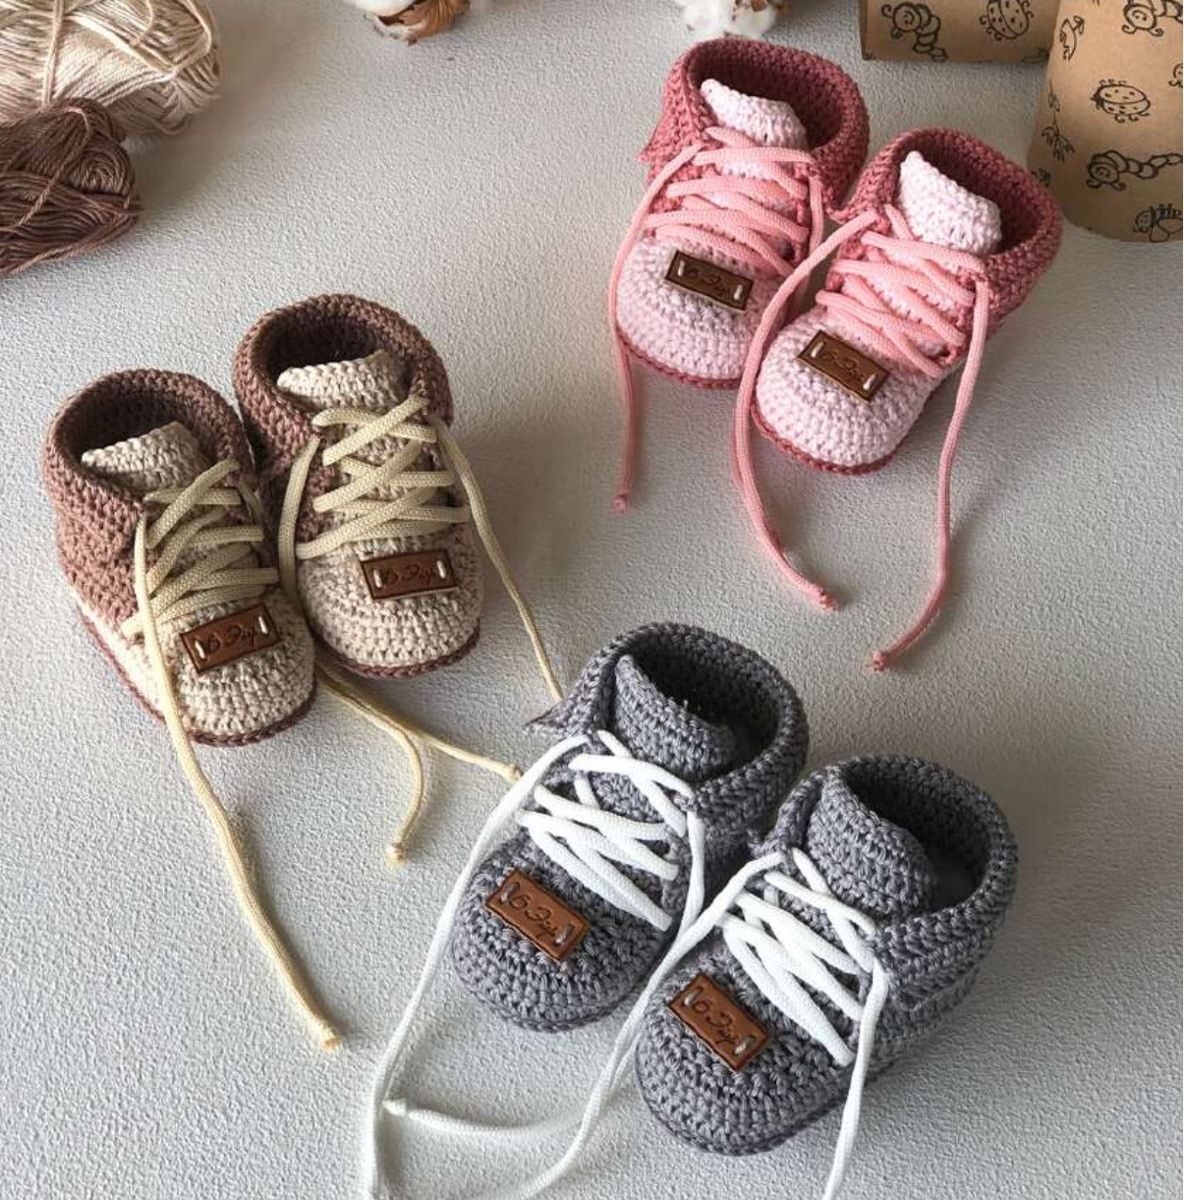
These crochet baby shoes look like tiny lace up sneakers, with a sturdy sole, a contrast toe and tongue, and real laces. They come in 4 sizes, from newborn to 12 months, and make a sweet baby shower gift.
This free crochet baby shoes pattern has every round for every size written out below, with 28 step photos. Prefer paper? Download the free printable PDF at the end.
Materials
- 2 skeins of 100% mercerized cotton in two colors, 50 g with 125 m (137 yd) each. Another yarn of the same fiber and thickness works too, as long as it gives the same gauge.
- A 2.5 mm (C/2) or 3.0 mm (D/3) crochet hook, or the size that gives you the gauge
- Shoe laces, satin ribbon or a 4 mm cord
- A tag, a brooch or a button to decorate the toe (optional)
- Scissors, a measuring tape, and a tapestry needle or a small crochet hook
Skill level and sizes
This is an intermediate pattern. You work around a chain for the sole, crochet around the posts of the stitches for the sides, and shape the toe by working several stitches together. The photos show each step.
Measure the baby's foot from heel to toe for the best fit, then choose the size in the chart.
| Size | Foot length | Start chain |
|---|---|---|
| Newborn | 8 cm (3.15 in) | 16 ch |
| 0 to 3 months | 9 cm (3.5 in) | 19 ch |
| 3 to 6 months | 10 cm (3.9 in) | 22 ch |
| 6 to 12 months | 11 to 12 cm (4.3 to 4.7 in) | 26 ch |
Gauge: 26 dc and 13 rows make 10 cm (4 in). Take the time to check it: the size of the shoe depends on it.
Abbreviations (US terms)
| ch | chain |
|---|---|
| sl st | slip stitch |
| sc | single crochet |
| hdc | half double crochet |
| dc | double crochet |
| dc2tog | double crochet 2 stitches together |
| MC | main color |
| CC | contrast color |
| RS | right side |
| WS | wrong side |
New to half double or double crochet? Our free crochet stitch guide explains the basic stitches step by step.
Pattern
Numbers are given for the 4 sizes in order: newborn/0 to 3 months/3 to 6 months/6 to 12 months. The number in brackets is the stitch count at the end of the round. In most photos the main color is brown and the contrast color is beige.
Sole
- StartWith MC, ch 16/19/22/26.
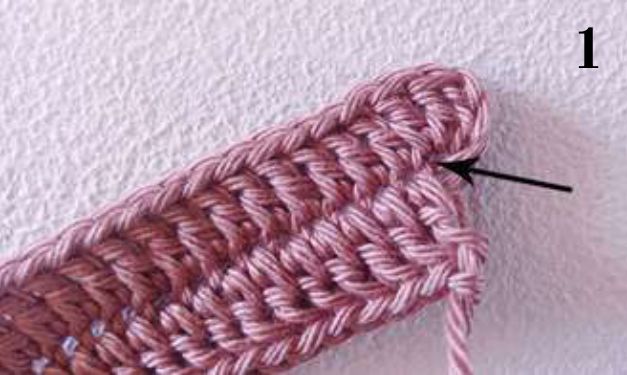
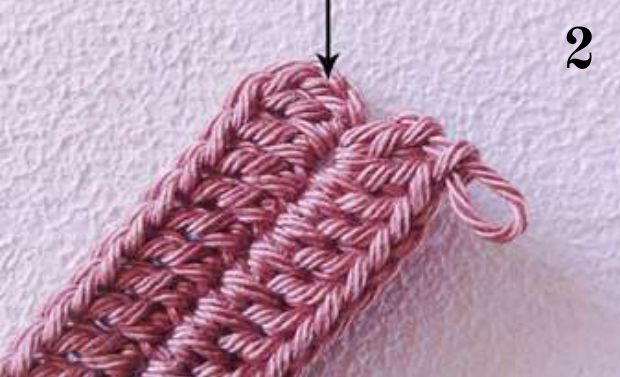
- Round 12 dc in the 4th ch from the hook, dc in the next 11/14/17/21 ch, 6 dc in the last ch. Continue along the other side of the chain: dc in the next 11/14/17/21 ch, 3 dc in the last ch (photo 1). Join with a sl st to the top of the chain (photo 2). (34/40/46/54)
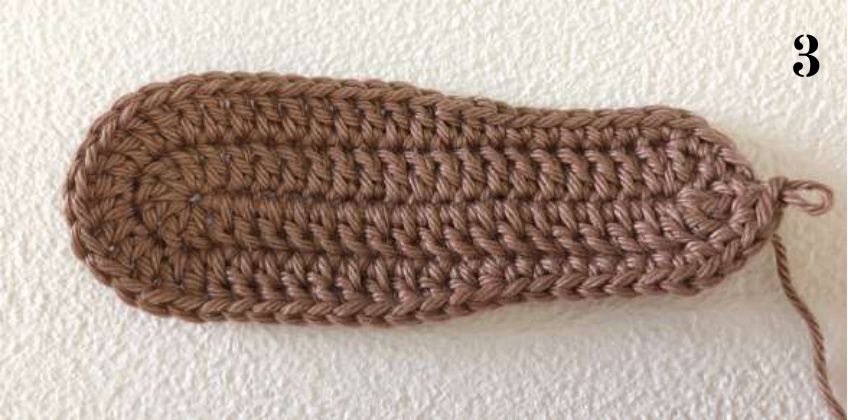
- Round 2Ch 1 (counts as 1 sc), sc in the same stitch, sc in the next stitch, 2 sc in the next stitch, sc in the next 4/5/6/7 stitches, hdc in the next 2 stitches, dc in the next 5/7/9/12 stitches, 2 dc in each of the next 6 stitches, dc in the next 5/7/9/12 stitches, hdc in the next 2 stitches, sc in the next 4/5/6/7 stitches, 2 sc in the next stitch, sc in the next stitch, 2 sc in the next stitch. Join with a sl st to the ch 1 (photo 3). (44/50/56/64)
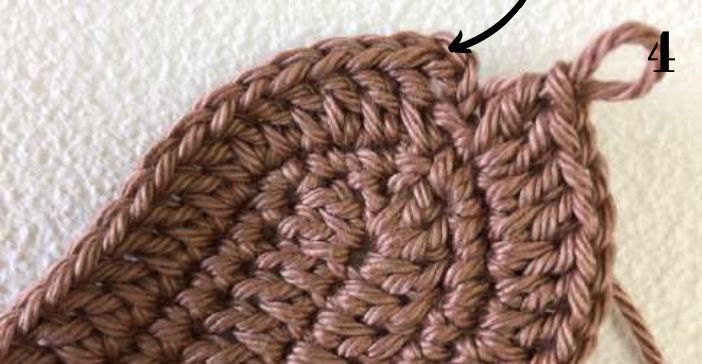
- Round 3Ch 3 (counts as 1 dc), dc in the same stitch, (dc in the next stitch, 2 dc in the next stitch) 2 times, dc in the next 11/14/17/21 stitches, (2 dc in the next stitch, dc in the next stitch) 6 times, dc in the next 11/14/17/21 stitches, (2 dc in the next stitch, dc in the next stitch) 2 times, 2 dc in the next stitch. Join with a sl st to the top of the ch 3 (photo 4). (56/62/68/76)
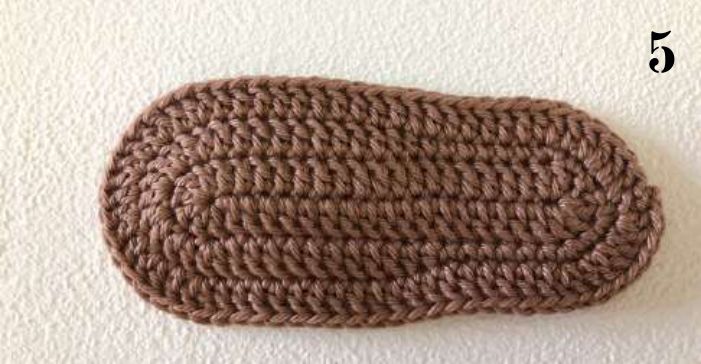
- FinishFasten off. The sole is ready (photo 5).
Sides
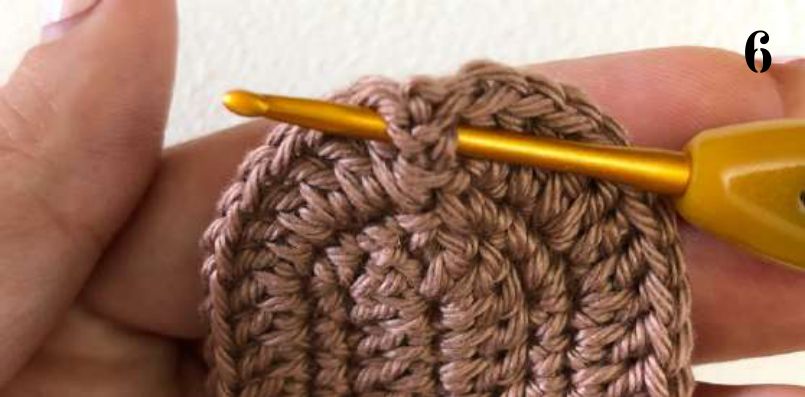
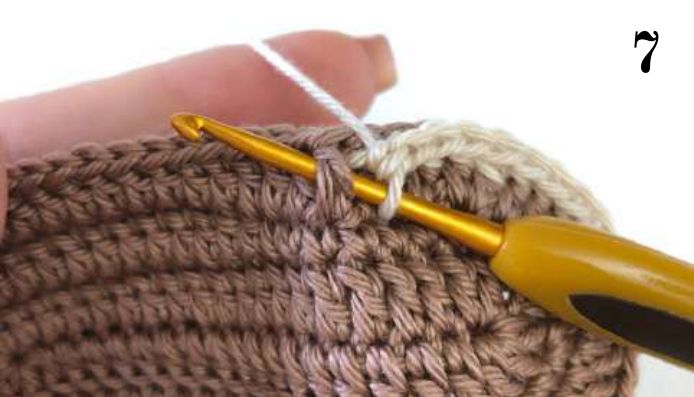
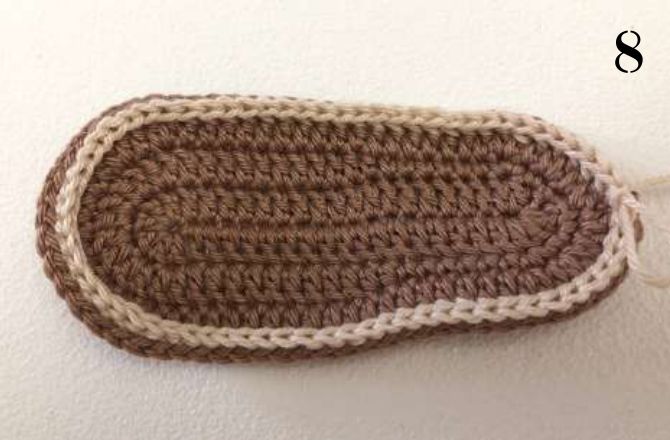
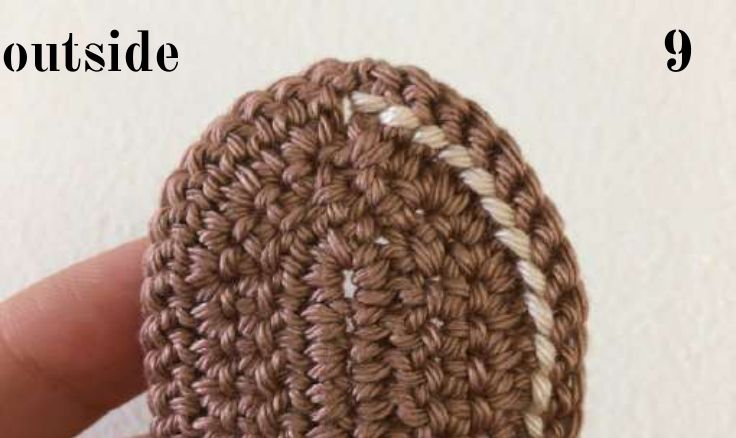
Work the sides with CC, starting at the beginning of the round. Make each stitch of round 1 around the post of the dc below, not into the top of the stitch (photos 6 and 7). The right side faces the inside of the shoe; photo 9 shows the outside.
- Round 1With the right side facing you: ch 1 (counts as sc), sc around the post of the next 55/61/67/75 dc. Join with a sl st to the ch 1. (56/62/68/76)
- Round 2Ch 3 (counts as dc), dc in the next 55/61/67/75 stitches. Join with a sl st. (56/62/68/76)
- Round 3Ch 1 (counts as sc), sc in the next 55/61/67/75 stitches. Join with a sl st. (56/62/68/76)
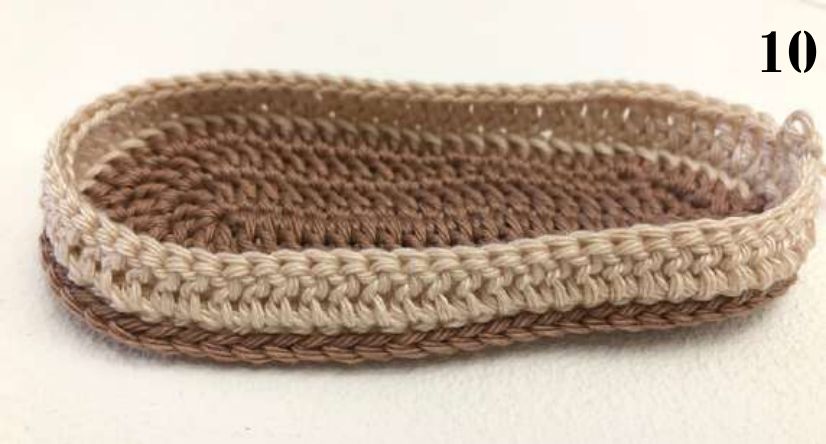
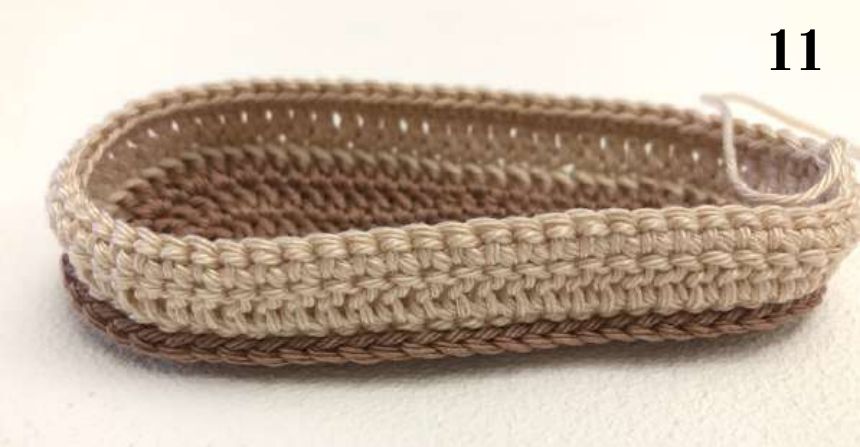
- FinishFasten off. The sides are ready (photos 10 and 11).
For a chubby foot or a high instep, repeat round 3 once or twice more to make the sides higher.
Toe
The toe is worked back and forth in rows with CC, shaped with decreases.
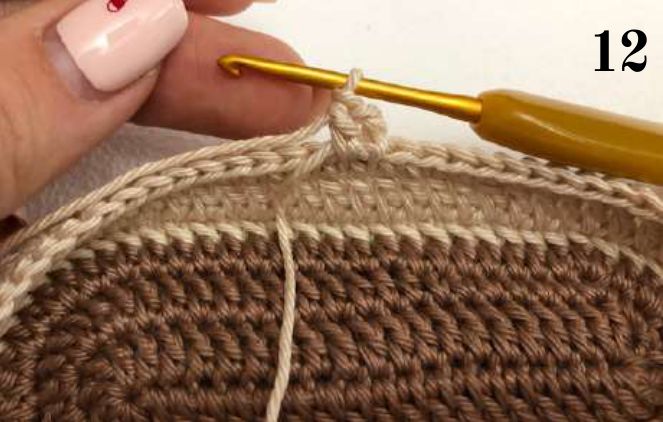
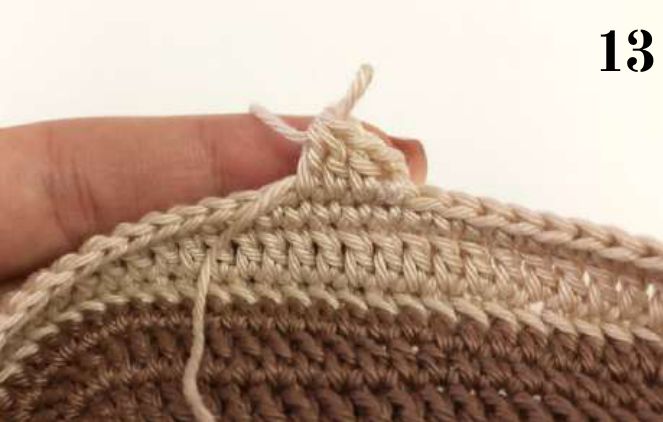
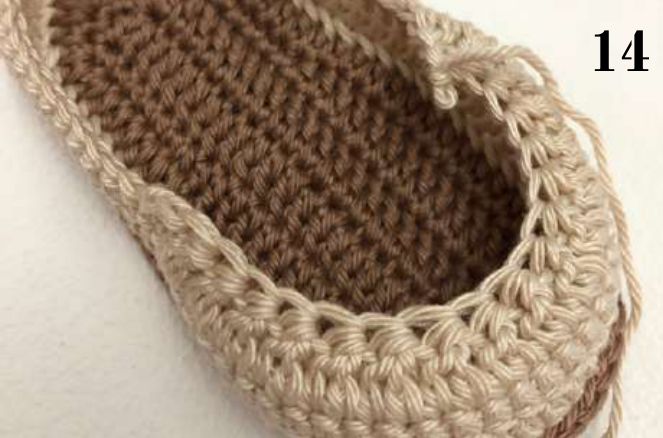
- Row 1 (WS)Count 14/15/16/18 stitches from the beginning of the round and join CC in the 15th/16th/17th/19th stitch (photo 12). Ch 2, dc in the next stitch, dc2tog 13/15/17/19 times (photos 13 and 14).
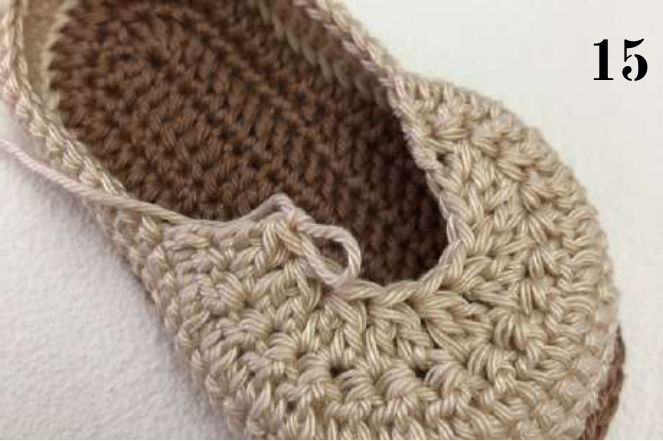
- Row 2 (RS)Ch 2, dc in the next stitch, dc2tog 6/7/8/9 times (photo 15).
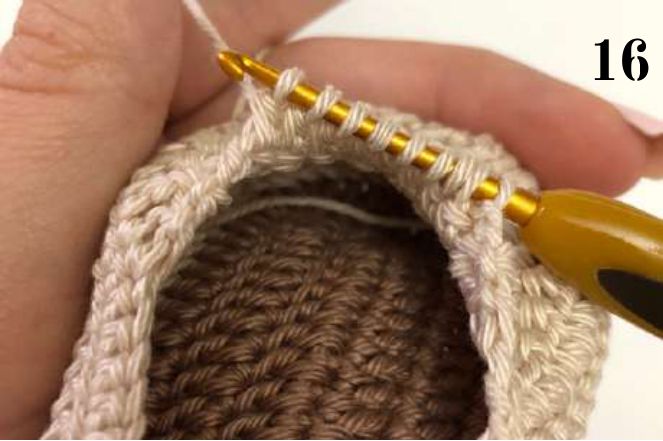
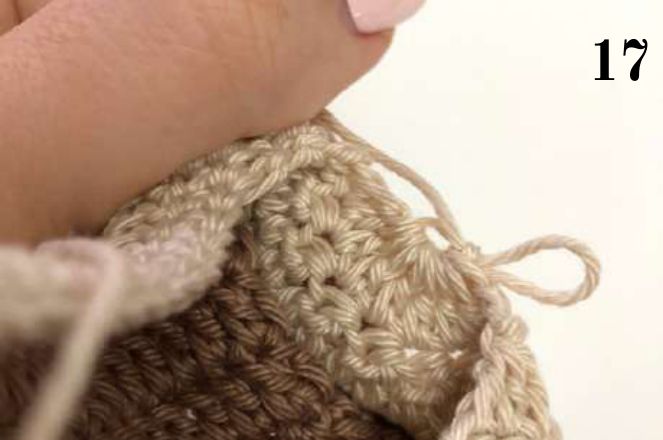
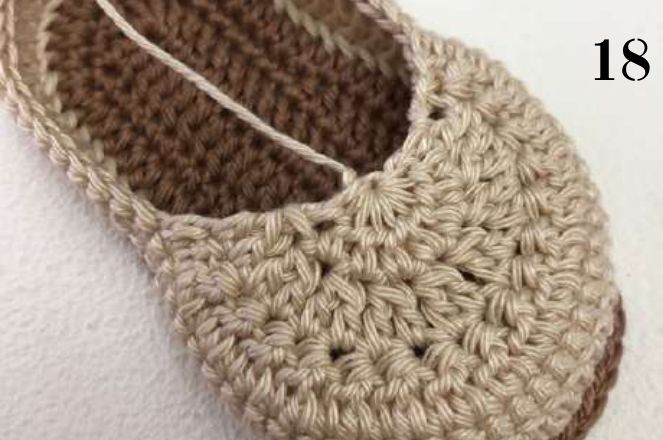
- Row 3 (WS)Ch 2, then work the next 6/7/8/9 dc together (photos 16 to 18).
- FinishFasten off. The toe is ready.
Tongue (all sizes)
The tongue is the same for all sizes. Keep working back and forth in rows with CC.
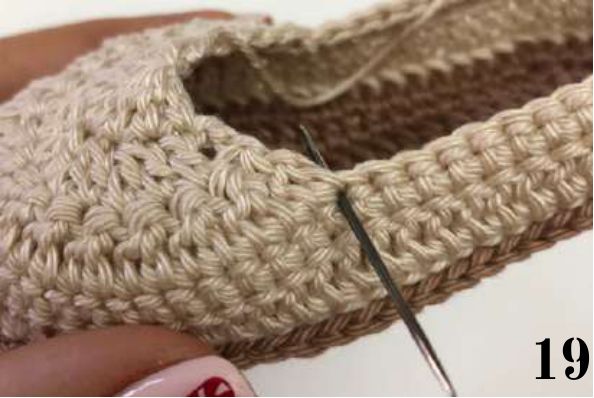
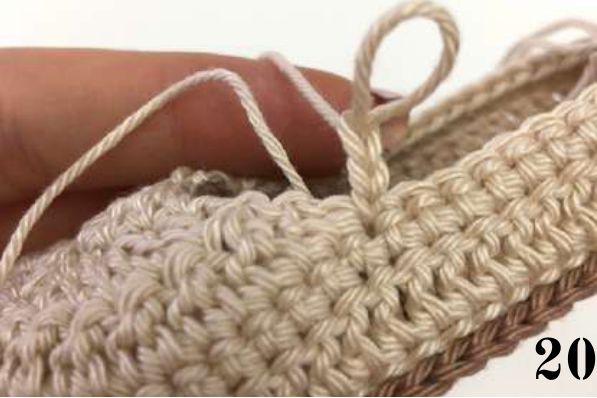
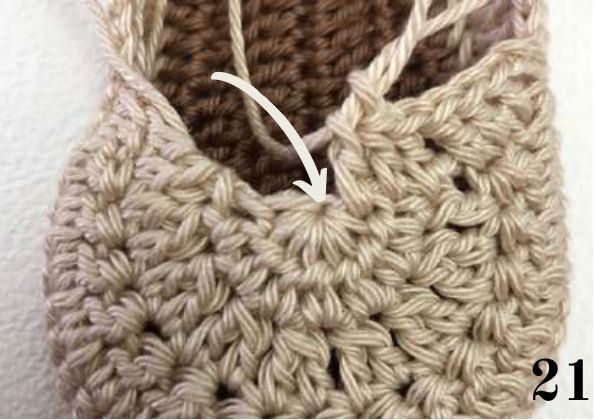
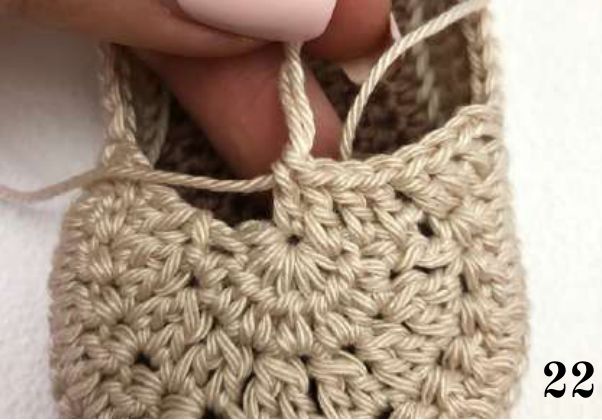
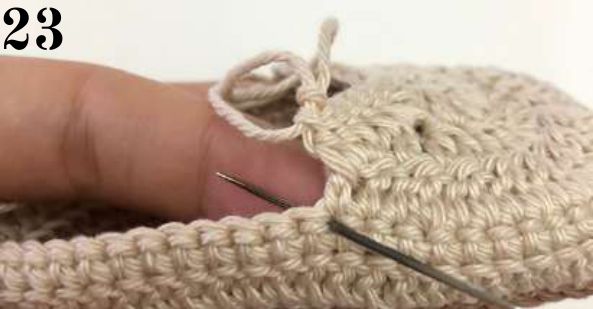
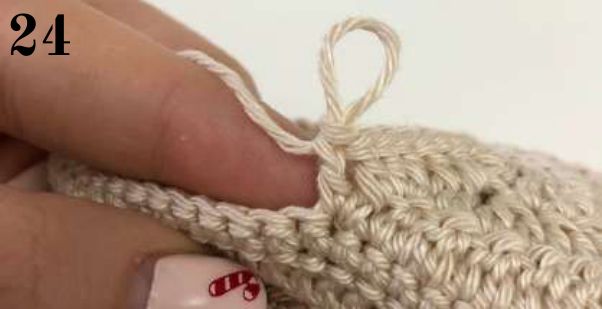
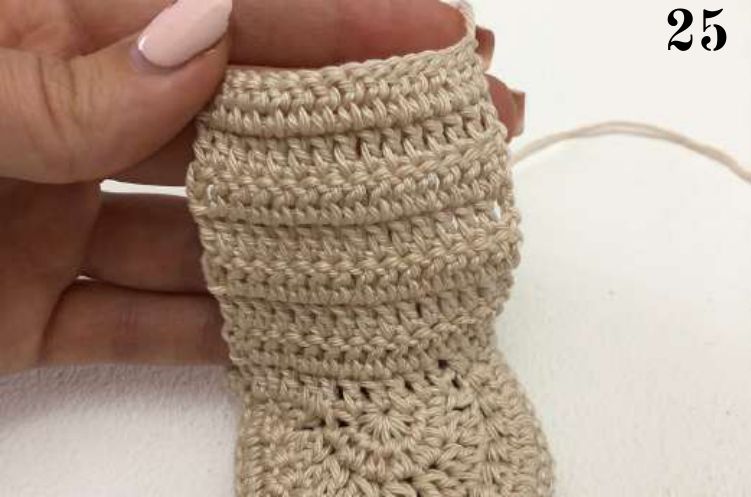
- Row 1Join the yarn in the stitch shown in photo 19. Ch 3 (counts as dc), 6 dc along the edge of the toe, dc in the stitch shown in photo 21, 6 dc along the next edge of the toe, and the last dc in the stitch shown in photo 23. Turn. (15)
- Rows 2 to 8Ch 3 (counts as dc), dc in the next 14 stitches. Turn. (15)
- FinishFasten off. The tongue is ready (photo 25).
Upper part
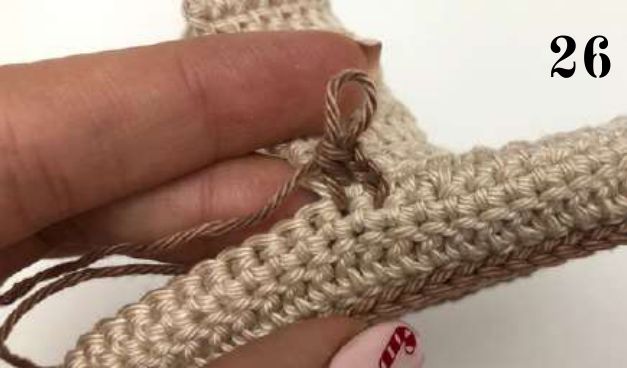
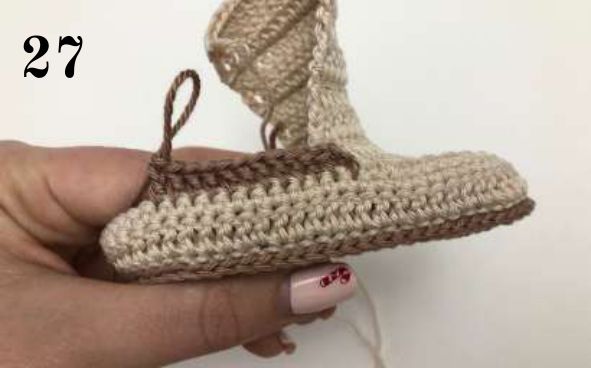
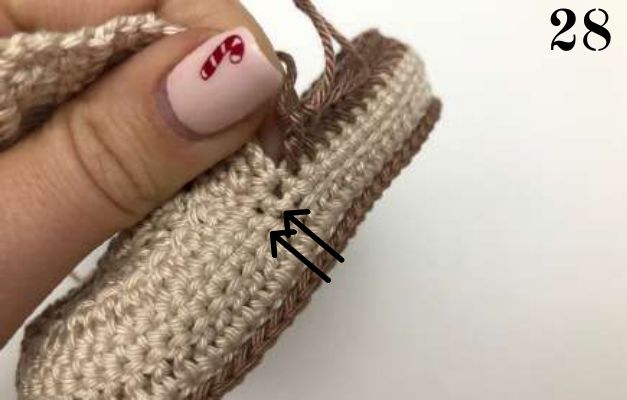
- Row 1Join MC in the stitch shown in photo 26. Ch 3 (counts as dc), dc in the next stitch, dc in the next 28/30/32/36 stitches, then dc in the 2 stitches shown in photo 28. Turn. (32/34/36/40)
- Rows 2 to 10Ch 3 (counts as dc), dc in the next 31/33/35/39 stitches. Turn. (32/34/36/40)
- FinishFasten off.
Finishing
- Weave in all the ends with a tapestry needle or a small crochet hook.
- Fold the top three rows of the upper part down, like a collar.
- Thread the laces or ribbon through the upper part on both sides of the tongue, as on the finished shoes.
- Decorate the toe with a tag, a brooch or a button if you like.
- Make the second shoe the same way.
For shoes a baby will wear, sew any button or tag on very firmly, or skip it, so there is nothing small to pull off.
Tips for perfect shoes
- Check your gauge before you start: the size of the shoe depends on it.
- Count your stitches at the end of each sole round, then compare the sole with the baby's foot.
- Use the photo numbers to find the right stitch to join each new part.
- Make both soles first, so the pair comes out the same size.
Questions
Which size should I make?
Measure the baby's foot from heel to toe and choose the size in the chart: 8 cm for newborn, 9 cm for 0 to 3 months, 10 cm for 3 to 6 months and 11 to 12 cm for 6 to 12 months. Measuring gives a better fit than going by age.
What yarn do I need?
Two skeins of 100% mercerized cotton in two colors, 50 g with 125 m (137 yd) each. Another yarn of the same fiber and thickness works too, as long as it gives the same gauge.
Can I use ribbon instead of laces?
Yes. Shoe laces, satin ribbon or a 4 mm cord all work.
Is this pattern good for beginners?
It is an intermediate pattern. It uses single, half double and double crochet, stitches worked around the post, and decreases of several stitches together. The 28 photos show each of these steps.
Can I sell the shoes I make?
Yes. You are welcome to sell the finished shoes you make from this pattern, and a credit to Crochet Simplified with a link to crochetsimplified.com is appreciated. Please do not share, copy or sell the pattern itself.
Is there a printable version?
Yes. The free PDF has the whole pattern for all 4 sizes with the step photos. Download it, open it on your phone or print the pages you need.
Using this pattern
This pattern is for your personal use. You may not copy, share, translate, resell or publish this pattern or its photos, in print or online, in whole or in part, free or paid.